使用Ceph作为OpenStack的后端存储配置过程详解
日期:2015-04-08点击次数:1679
概述
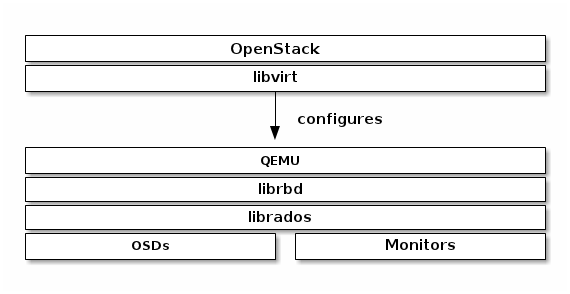
libvirt配置了librbd的QEMU接口,通过它可以在OpenStack中使用Ceph块存储。Ceph块存储是集群对象,这意味着它比独立的服务器有更好的性能。
在OpenStack中使用Ceph块设备,必须首先安装QEMU,libvirt和OpenStack,下图描述了 OpenStack和Ceph技术层次结构:
http://my.oschina.net/JerryBaby/blog/376580 我翻译的官方文档,仅供参考 ^ ^。
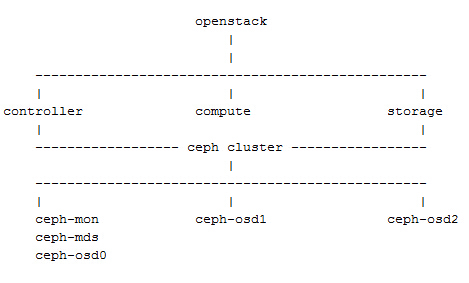
系统规划
OpenStack集群:
控制节点:openstack(controller)192.168.1.131
计算节点:compute 192.168.1.132
存储节点:storage 192.168.1.133
Ceph集群:
monitor、mds、osd0 节点:openstack(controller)192.168.1.131
osd1:compute 192.168.1.132
osd2:storage 192.168.1.133
系统架构:
配置过程
Important:由于这里将两套集群服务部署在了同一组节点上,所以配置过程中省略了一些关于Ceph集群的配置。
创建存储池
-
# ceph osd pool create volumes 128
-
-
# ceph osd pool create images 128
-
-
# ceph osd pool create vms 128
设置Ceph客户端认证
在OpenStack节点执行如下命令:
-
# ceph auth get-or-create client.cinder mon 'allow r' osd 'allow class-read object_prefix rbd_children, allow rwx pool=volumes, allow rwx pool=vms, allow rx pool=images'
-
-
# ceph auth get-or-create client.glance mon 'allow r' osd 'allow class-read object_prefix rbd_children, allow rwx pool=images'
为client.cinder,client.glance添加密钥文件来访问节点并改变属主:
-
# ceph auth get-or-create client.glance | ssh openstack sudo tee /etc/ceph/ceph.client.glance.keyring
-
-
# ssh openstack sudo chown glance:glance /etc/ceph/ceph.client.glance.keyring
-
-
# ceph auth get-or-create client.glance | ssh compute sudo tee /etc/ceph/ceph.client.glance.keyring
-
-
# ssh compute sudo chown nova:nova /etc/ceph/ceph.client.glance.keyring
-
-
# ceph auth get-or-create client.cinder | ssh compute sudo tee /etc/ceph/ceph.client.cinder.keyring
-
-
# ssh compute sudo chown nova:nova /etc/ceph/ceph.client.cinder.keyring
-
-
# ceph auth get-or-create client.cinder | ssh storage sudo tee /etc/ceph/ceph.client.cinde.keyring
-
-
# ssh storage sudo chown cinder:cinder /etc/ceph/ceph.client.cinder.keyring
运行nova-compute的节点nova-compute进程需要密钥文件。它们也存储client.cinder用户的密钥在libvirt。libvirt进程在Cinder中绑定块设备时需要用到它来访问集群。
在nova-compute节点创建一个临时的密钥副本:
-
# uuidgen
-
-
457eb676-33da-42ec-9a8c-9293d545c337
-
-
# cat > secret.xml <
-
-
-
457eb676-33da-42ec-9a8c-9293d545c337
-
-
-
client.cinder secret
-
-
EOF
-
-
# sudo virsh secret-define --file secret.xml
-
-
# sudo virsh secret-set-value --secret 457eb676-33da-42ec-9a8c-9293d545c337 --base64 $(cat client.cinder.key) && rm client.cinder.key secret.xml
配置Glance
编辑 /etc/glance/glance-api.conf并添加如下内容:
-
[DEFAULT]
-
-
default_store = rbd
-
-
...
-
-
[glance_store]
-
-
stores = rbd
-
-
rbd_store_pool = images
-
-
rbd_store_user = glance
-
-
rbd_store_ceph_conf = /etc/ceph/ceph.conf
-
-
rbd_store_chunk_size = 8
如果要启动镜像的写时复制功能,添加下面的 [DEFAULT] 部分:
-
show_image_direct_url = True
配置Cinder
在openstack节点和storage节点编辑 /etc/cinder/cinder.conf配置文件并添加如下内容:
-
volume_driver = cinder.volume.drivers.rbd.RBDDriver
-
-
rbd_pool = volumes
-
-
rbd_ceph_conf = /etc/ceph/ceph.conf
-
-
rbd_flatten_volume_from_snapshot = false
-
-
rbd_max_clone_depth = 5
-
-
rbd_store_chunk_size = 4
-
-
rados_connect_timeout = -1
-
-
glance_api_version = 2
如果使用cephx验证,需要配置user和uuid:
-
rbd_user = cinder
-
-
rbd_secret_uuid = 457eb676-33da-42ec-9a8c-9293d545c337
配置Nova
为了挂载Cinder设备(普通设备或可引导卷),必须指明使用的用户及UUID。libvirt将使用期在Ceph集群中进行连接和验证:
-
rbd_user = cinder
-
-
rbd_secret_uuid = 457eb676-33da-42ec-9a8c-9293d545c337
编辑 /etc/nova/nova.conf并添加如下内容:
-
[libvirt]
-
-
images_type = rbd
-
-
images_rbd_pool = vms
-
-
images_rbd_ceph_conf = /etc/ceph/ceph.conf
-
-
rbd_user = cinder
-
-
rbd_secret_uuid = 457eb676-33da-42ec-9a8c-9293d545c337
-
-
libvirt_live_migration_flag="VIR_MIGRATE_UNDEFINE_SOURCE,VIR_MIGRATE_PEER2PEER,VIR_MIGRATE_LIVE,VIR_MIGRATE_PERSIST_DEST"
禁用文件注入。当启动一个实例的时候,nova通常会尝试打开rootfs。这时,nova注入一些数据,如密码、ssh 密钥,配置文件等到文件系统中。然而,这最好依靠元数据服务和cloud-init来完成。
在每个计算节点,编辑 /etc/nova/nova.conf 在 [libvirt] 标签添加:
-
libvirt_inject_password = false
-
-
libvirt_inject_key = false
-
-
libvirt_inject_partition = -2
重启服务
-
# sudo glance-control api restart
-
-
# sudo service nova-compute restart
-
-
# sudo service cinder-volume restart
-
-
# sudo service cinder-backup restar
从块设备引导
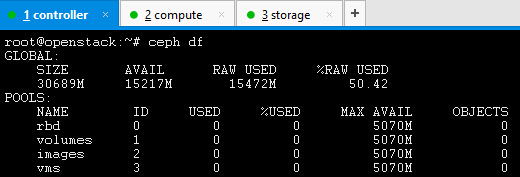
Ceph后端存储状况:
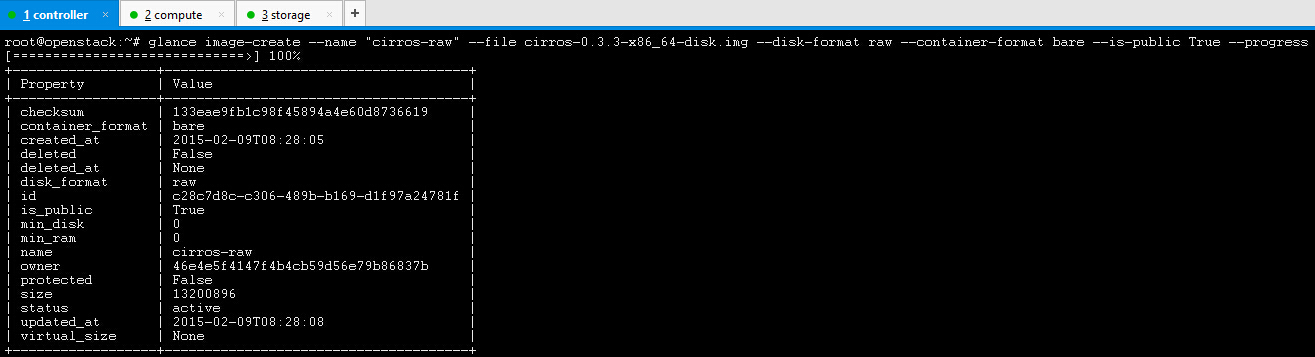
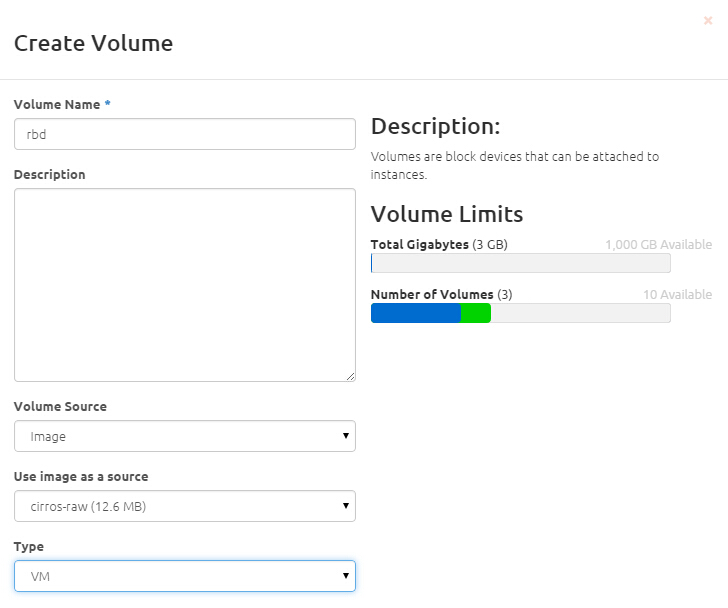
Ceph不支持从qcow2格式的镜像引导,所以创建一个raw格式的镜像:
创建一个可引导卷:
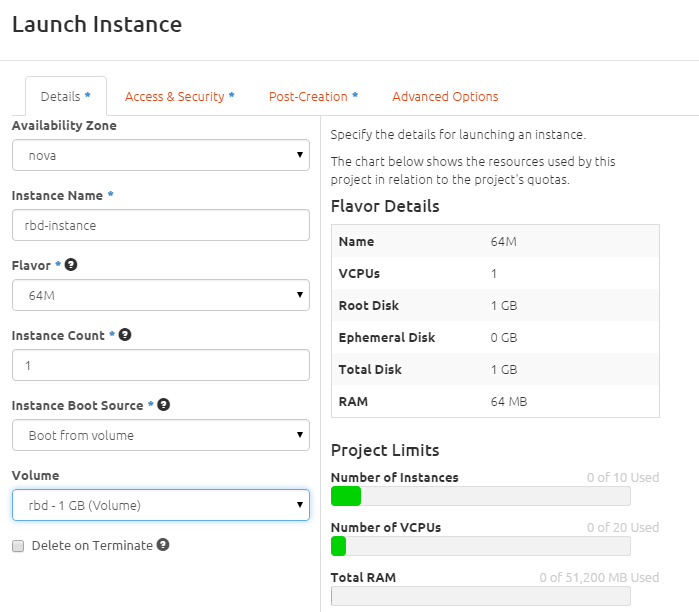
从可引导卷创建一个实例:
查看Ceph存储状况:

(文/Jerry_Baby 开源中国博客)